Showing posts with label how-to. Show all posts

Monday, November 21, 2016

6 Way to Wear Decadent Bliss


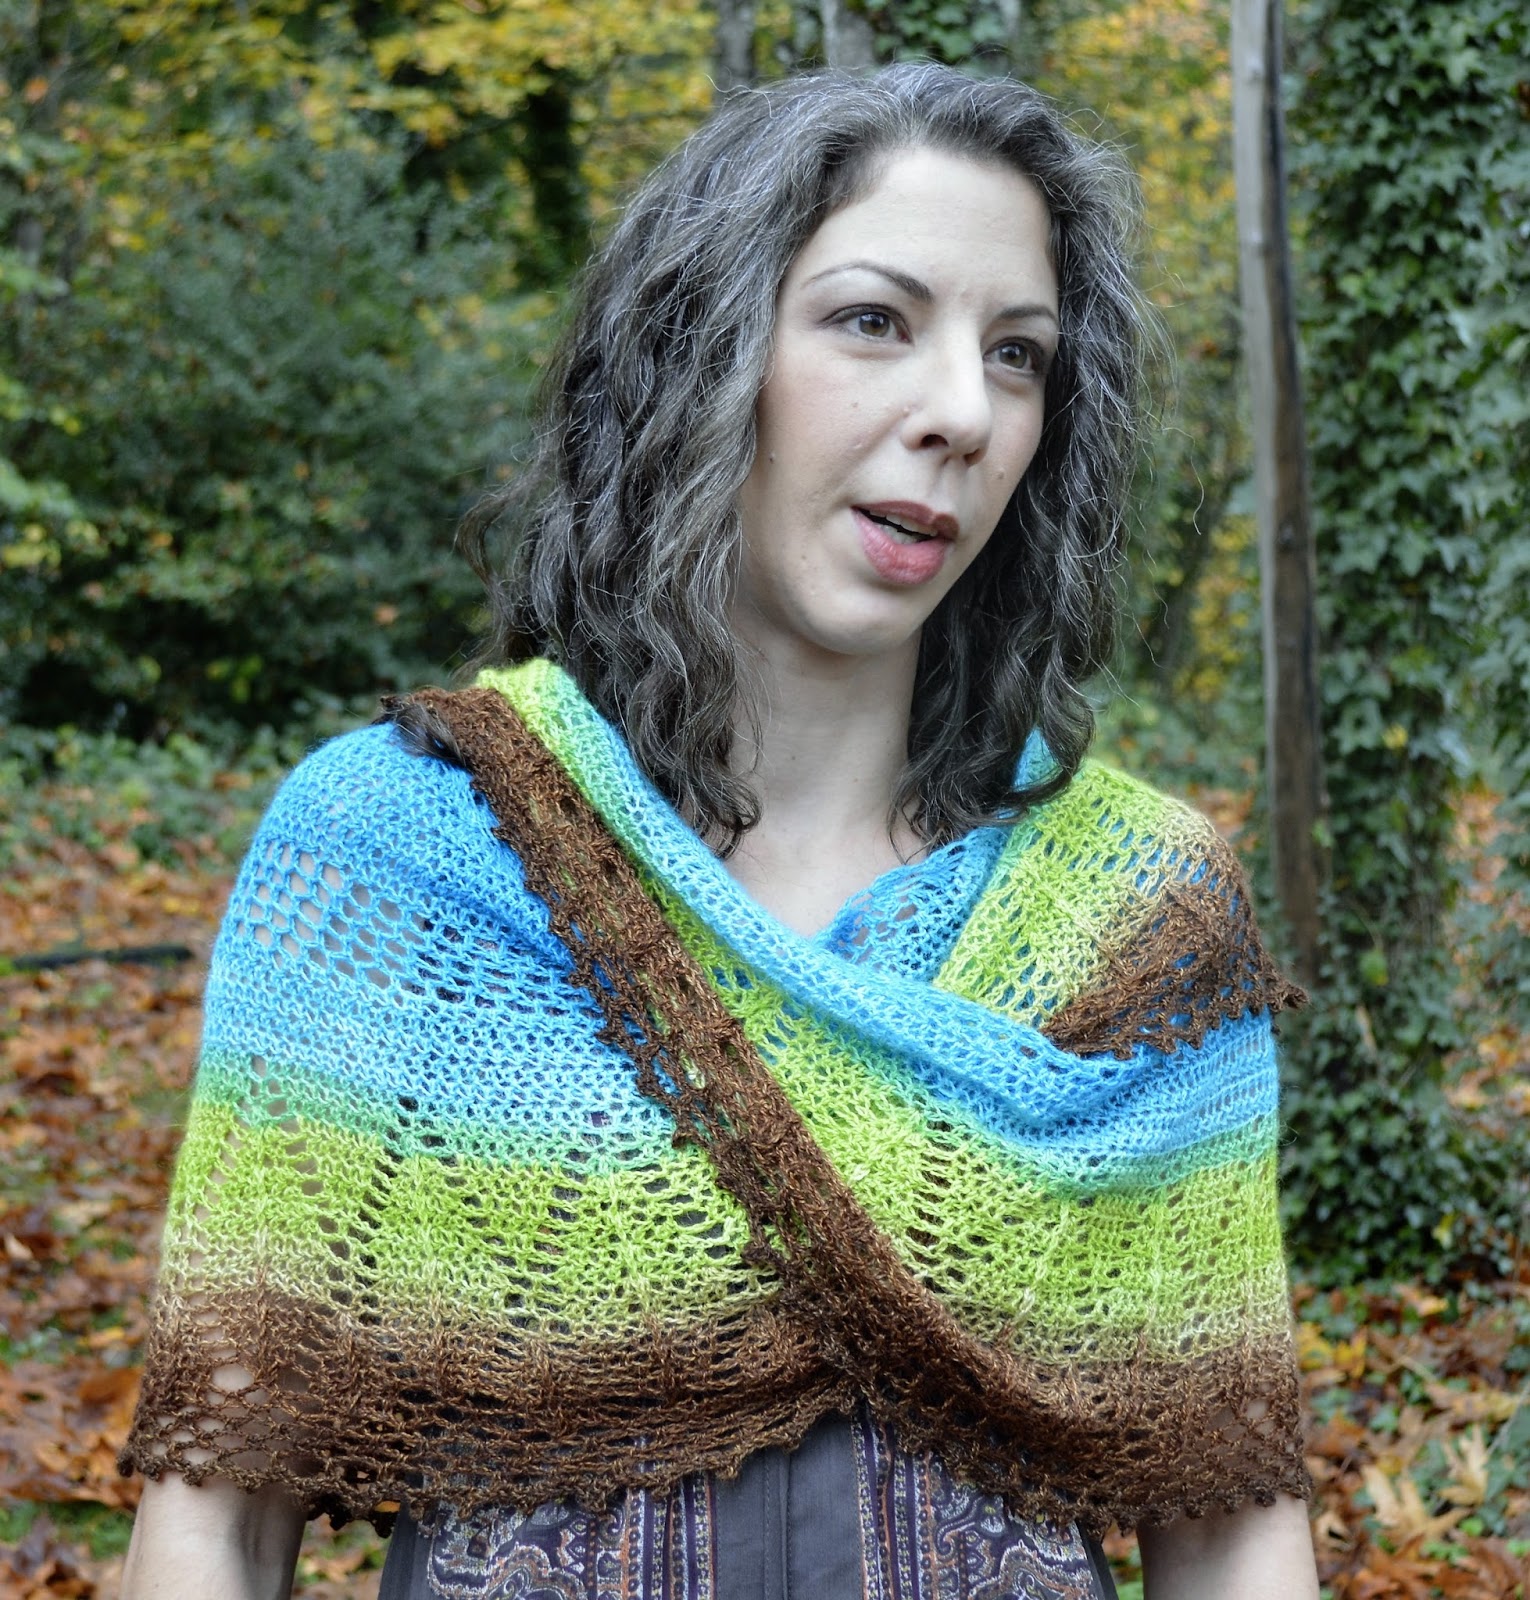
My newest pattern, Decadent Bliss is a long crescent shawl which can be worn in endless ways. The beauty of this shape shawl is that is doesn't need a shawl pin to stay put. This collaboration with Fierce Fibers will be be a Crochet Along coming in January, with kits available here for Preorder This Month Only!

Just a few ways Decadent Bliss (or any long crescent shawl) can be worn:
Simple Wrap: Leave one long end of the shawl in front,
and drape the rest around to fall at the back.
The long ends will keep the shawl in place, while the
lovely lace border is shown off across the front.

Over The Shoulders: Wrap around the shoulders
and throw both ends around the back.
Grab and Go: Just throw it over your
shoulders and go!
Gathering: Use a shawl pin, scarf ring,
or tie just it in a knot to secure it a little.

Shrug: Around the shoulders,

tie in back.


Elegant Evening: The long crescent is deep enough to keep your arms warm even when showing a little shoulder on an evening out.
Scarf: By far my favorite, as fall turns to winter,
bunch it around your neck 2 or 3 times as a scarf!
The pattern for this gorgeous shawl will be released in January. However, if you Preorder the CAL Kit for the yarn and pattern this month, you will be the first to receive the pattern, as the kits will ship in time for Christmas. Kits will include one 750 yard ball of this delicious baby alpaca and silk gradient lace weight yarn and a printed copy of Laurinda's pattern, with clearly written and tech edited instructions and symbol diagrams.

Get both the yarn and pattern for less than the cost of the yarn! Kit Preorders end in November. Kits ship in December. And the CAL will start in January! Join us and Reserve Your Kit Today! Four beautiful colorways to choose from.

Monday, October 17, 2016

Tutorial - Starting a Mobius Twist (RH)

Any long looped cowl may be called an "Infinity Cowl" these days. But a true infinity cowl is one with a "Mobius Twist" where each round forms a figure eight or infinity symbol, creating a twist in the loop as you work. Learn how expanding each round from the center out will affect your stitch pattern and how to adjust your stitches to look their best on both sides of the work whether working into a chain or foundation single crochets.

Tutorial (Right-Handed):

1. Chain indicated number of stitches. Lay flat so the front of all stitches are facing up without any twists.

2. Rotate end of chain one half turn so back bump is facing you to create a half twist on one end. 

3. Insert hook into top loop of back side of each chain.

4. Join with slip stitch of first chain to form ring with one twist.

5. Work in top loop of each chain once around.

6. To complete Round 1, continue working once more around in unused loops of beginning chain, inserting hook in same hole as first time around but from the other side of the stitch.

7. Each completed round forms a figure 8 or "infinity" symbol. Finish round by joining in first stitch and turning, or work in continuous rounds, depending on the pattern.

Note: When working continuous rounds with a mobius loop, the top half will be all the right sides of the stitches while the bottom half is all wrong sides of the rounds. This looks better with some stitch patterns than others.
COWLtober Week 2: Twist & Spin Cowl
in Spincycle Knit Fast Die Young

Tutorial: Starting a Mobius Twist - LH

Any long looped cowl may be called an "Infinity Cowl" these days. But a true infinity cowl is one with a "Mobius Twist" where each round forms a figure eight or infinity symbol, creating a twist in the loop as you work. Learn how expanding each round from the center out will affect your stitch pattern and how to adjust your stitches to look their best on both sides of the work whether working into a chain or foundation single crochets.
 
Tutorial (Left-Handed):

1. Chain indicated number of stitches. Lay flat so the front of all stitches are facing up without any twists.

2. Rotate end of chain one half turn so back bump is facing you to create a half twist on one end

3. Insert hook into top loop of back side of each chain.
4. Join with slip stitch of first chain to form ring with one twist.

5. Work in top loop of each chain once around.

6. To complete Round 1, continue working once more around in unused loops of beginning chain, inserting hook in same hole as first time around but from the other side of the stitch.

7. Each completed round forms a figure 8 or "infinity" symbol. Finish round by joining in first stitch and turning, or work in continuous rounds, depending on the pattern.

Note: When working continuous rounds with a mobius loop, the top half will be all the right sides of the stitches while the bottom half is all wrong sides of the rounds. This looks better with some stitch patterns than others.
COWLtober Week 2: Twist & Spin Cowl
in Spincycle Knit Fast Die Young

Thursday, April 21, 2016

Elsie's Farewell Shawl - New Pattern!

Designed for Ficstitches Yarns Spring 2016 Kit Club 
Mary stopped to adjust the drape of her new shawl, straightening the collar and making certain the lace laid just so over her shoulders. Elsie smiled to see her preening over it . . .”
- Excerpt from “The Sojourn Stitch” coming soon from C. Jane Reid

In researching the earliest documented forms of crochet for her first novel, The Secret Stitchauthor C. Jane Reid found references Shepherd's Knitting, which was not knitting at all, but actually slip stitches worked with a hooked tool. I wanted to design a collared shawl using this stitch like the wrapped shawls that tie at the back which might have been commonly worn in colonial times, but knew that an all slip stitch shawl would not be a fun project for a Kit Club.
Elsie's Shawl was actually the first design I thought of for our very first Ficstitches Yarns Crochet Kit Club, last year. But I needed a larger skein of yarn than the standard 400+ yard skein most fingering weight yarn comes in. When I saw Bumblebirch's 600 yard skein of Glen, I knew it would be perfect to make this a one skein project.
A modern interpretation of a collared wrap shawl, Elsie's Farewell Shawl begins with a collar formed of short rows of front loop only slip stitches. Then a triangle of shells descends from the collar, gradually decreasing to a curved point. The solid, stretchy fabric of the collar adds weight to the silky lace, keeping it draped over your shoulders without a shawl pin.
You can purchase Elsie's Farewell Shawl on Ravelry.
All Photos © Guy Holtzman


Tuesday, September 15, 2015

Tutorial Tuesday:Reverse Slip Knot

Reverse Slip Knot (alternative to Magic Circle)


Here is the first of several new tutorials I will be posting as resources for the pattern being sent out with our latest Ficstitches Yarns Crochet Kit Club. Don't miss out on the next kit available in October!

The Reverse Slip Knot can be used as an alternative when the Magic Circle (or adjustable loop) is called for in a pattern. Just remember that the first chain is your adjustable ring, so you may need to add one chain to the beginning if you start with a Reverse Slip Knot instead. Find Left-handed Tutorial HERE.

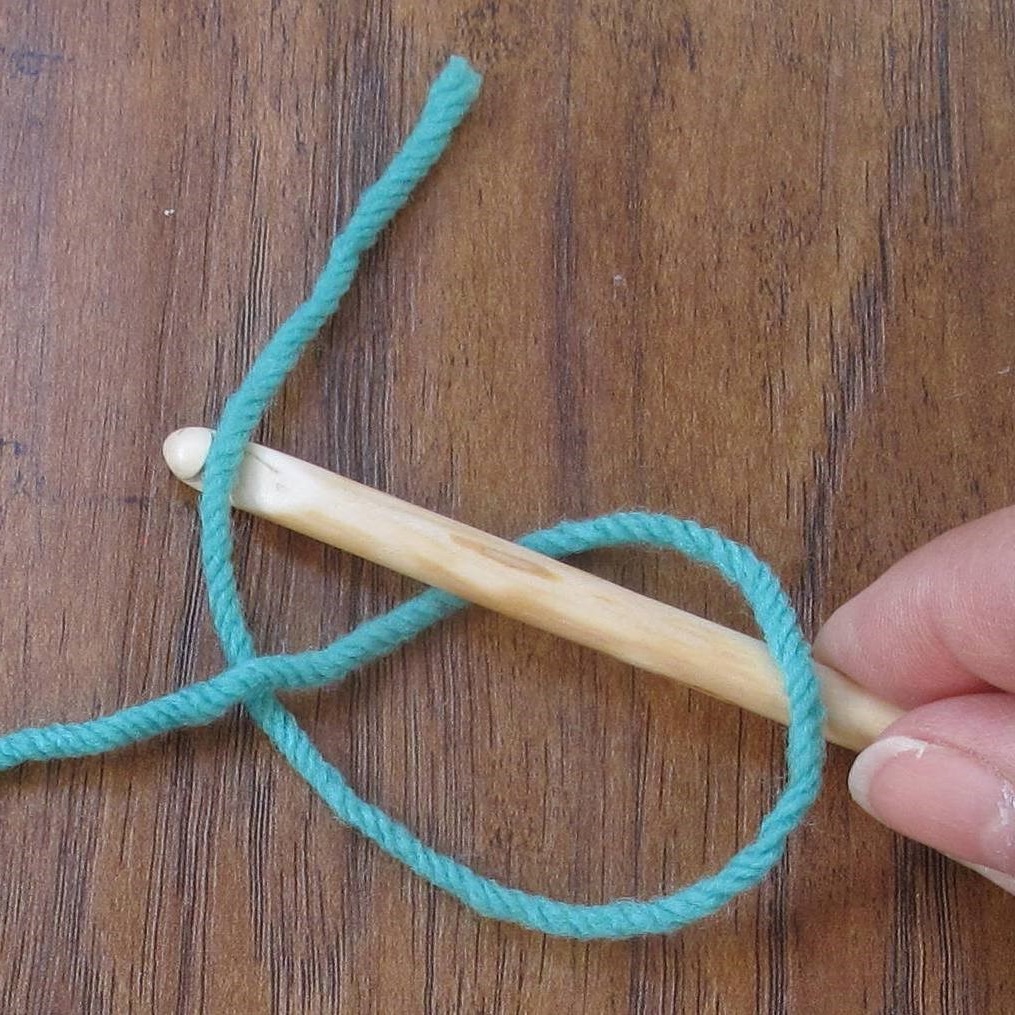
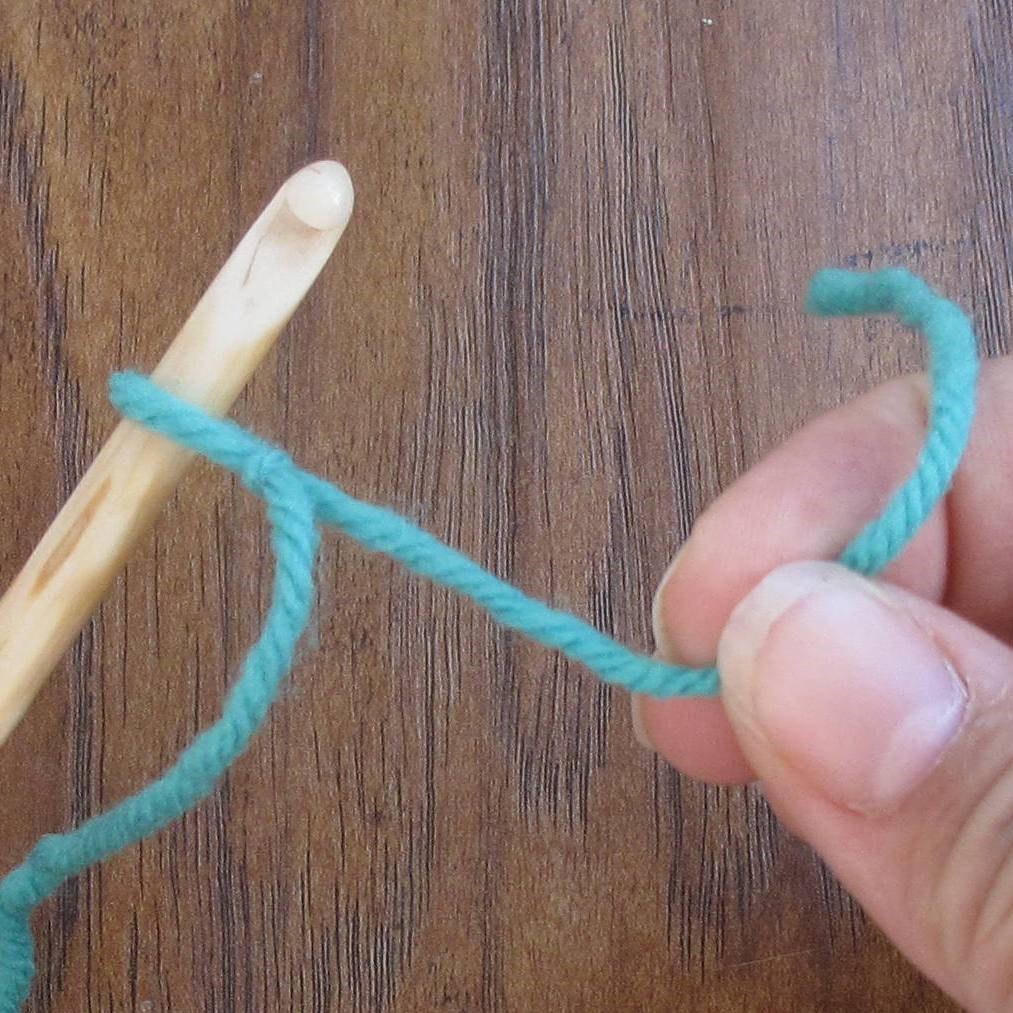
Making a Reverse Slip Knot Tutorial
 1.     Form loop, insert hook, yo short end.

2.     Pull loop of short end through with hook.

3.     Pull short end to tighten knot .

4.     Pull tight on hook.

Working Into a Reverse Slip Knot Tutorial
1.     Insert hook into farthest chain from hook, under 2 loops of chain.


2.    Work all indicated stitches of first round into that first chain.
3.    Pull short end to tighten Reverse Slip Knot and close hole.

For a long time, almost all patterns worked in the round used a Chain Circle, but this technique tends to leave a hole in the middle. This is likely because crochet was first developed for making lace, which is intended to have holes. But who wants a hole in the middle of a hat? Using the “Magic Circle” avoids this hole, by working stitches into a loop of yarn wrapped twice around your fingers which can be pulled tight after you are done working all of your stitches into the center of the loop.

Above is an alternative (which I originally learned as the “Magic Circle”) can be formed by simply working a Reverse Slip Knot. Rather than having the adjustable side of your slip knot attached to your skein of yarn, you will pull through the shorter tail, so you can pull the loop tight by simply pulling that end. There are a few different ways to work the Magic Circle. If you would like to try the more standard way of doing it, check out Moogly's Magic Circle Tutorial.

Tutorial Tuesday:Reverse Slip Knot - LH

Reverse Slip Knot - Left-Handed

(alternative to Magic Circle) 


Here is the first of several new tutorials I will be posting as resources for the being pattern sent out with our latest Ficstitches Yarns Crochet Kit Club. Don't miss out on the next kit available in October!

I use the Reverse Slip Knot as an alternative when the Magic Circle (or adjustable loop) is called for in a pattern. Just remember that the first chain is your adjustable ring, so you may need to add one chain to the beginning if you start with a Reverse Slip Knot instead. Find Right-handed Tutorial HERE.

Making a Reverse Slip Knot Tutorial
 1.     Form loop, insert hook, yo short end.

2.     Pull loop of short end through with hook.

3.     Pull short end to tighten knot .

4.     Pull tight on hook.

Working Into a Reverse Slip Knot Tutorial
1.     Insert hook into farthest chain from hook, under 2 loops of chain.


2.    Work all indicated stitches of first round into that first chain.


3.    Pull short end to tighten Reverse Slip Knot and close hole.

For more info about this way of starting a project, check out the Right-handed Tutorial.

Monday, September 22, 2014

Guest Post: Row-Counting by the Numbers: The How

 While I am on the road for my Book Tour this week, I have asked Carissa Reid, my good friend (contract crocheter, proofreader, end weaver, and sometimes copy writer) to write a couple of guest blog posts for me. I had noticed Carissa's unique solution to keeping track of row repeats in patterns, and asked her to share it with my readers. Enjoy this two-part guest post, today "The How" and tomorrow "The Tools"!

Here is Part 1 of Carissa Reid's guest post. Find Part 2 here.
 
Row-Counting by the Numbers: The How
By Carissa Reid


When I was first beginning to use crochet patterns, I encountered a problem that I’m sure others have faced: How to keep track of row repeats. It was easy enough to check off the rows as I progressed through the pattern, but when I hit a section that read “Rows 5-25: repeat rows 2-3,” I was at a loss. Unless they were very short rows, chances were I’d have to set the work aside at some point to pick up later, and who wants to spend the first ten minutes of precious crochet time counting rows to figure out where to pick up again?

I thought a row counter would solve the problem, but that only told me the current row, not which of the repeats I needed to begin. I might be on row 20, but was that a repeat of row 2 or row 3? Repeats of only two rows aren’t too difficult to figure with basic math, but there are times when I’m repeating three, four, even up to six rows and my basic math became word problems. If Carissa repeats six rows for 32 rows, and she ends on row 24, which row repeat would she begin to start row 25? 

And what happened if the row counter accidently reset or was lost? I have curious children with quick hands. I needed a method that would factor in multiple repeats, remain with the pattern, and couldn’t be reset or stolen by little fingers. 

My answer is simple, direct, and only needs a pencil. When I see a repeat in the pattern, I write the row numbers in the margin of the pattern. I like to keep it close to the row instructions, so I don’t have to flip pages or keep track of more pages than necessary. I only need the numbers and a small space beside each, so it doesn’t take much room and the margin serves well. If the repeats include multiple rows, then I divide those numbers in sections for however many rows repeat. So I might have:


5
6
7
8
in the margin for a single-row repeat. Or I might have:
5    6    7
8    9    10
11    12    13
in the margins for a three-row repeat. The numbers mark the current row on the pattern, and the placement notes the row repeated, so in the second example, if the pattern reads, “Rows 5-13: repeat rows 2-4,” then the number 5 would be the fifth row of the pattern and would repeat row 2.  As I complete the row, I put a check-mark beside the number and move to the next column and the next repeat, following the row numerically and knowing which repeat I’m on by the column the number is in.

It’s simple and it’s effective and all I needed was a pencil. But more on supplies next post. 
~*~
Carissa Reid is an author, crocheter, proofreader, and co-founder of Ficstitches Yarns Crochet Kit Clubs along with Laurinda. Information about her books can be found at www.CJaneReid.com.